Here’s how Singer, Brother, and Janome manuals recommend changing a sewing machine needle. I reviewed at least 3 manuals from each brand, so I haven’t skipped important bits.
If your machine is from another brand, this post will still apply. Most brands use the same process.
Here’s how to change a sewing machine needle (in a nutshell):
- Turn your sewing machine off.
- (Optional) Raise the presser foot and place fabric/paper underneath.
- Lower the presser foot.
- Raise the needle to the highest position.
- Loosen the needle screw by turning it counterclockwise (toward you).
- Pull the old needle out.
- (Optional) Check the new needle.
- Insert the new needle with the flat side facing the back of the machine. Push it up all the way.
- Tighten the needle screw by turning it clockwise (away from you).
I have more details and photos of each step below. Plus a 59-second video tutorial!
Pin this image to bookmark the post for later 🙂
**One Free Sewing Pattern. Every Thursday. Join the Email List 🙂**
How to replace a sewing machine needle (full video tutorial)
1. Turn your sewing machine off
Why? We don’t need any power to change the needle. It’s also safer because you can’t accidentally sew your fingers.
2. Raise the presser foot and place fabric/paper underneath
Raise the presser foot using the presser foot lever (it’s normally to the right of the needles).
Place fabric or paper under the presser foot. This will cover the needle plate hole so your needle can’t fall into the machine.
3. Lower the presser foot
4. Raise the needle to the highest position
Raise the needle by turning the handwheel toward you. The mark on the wheel (if there is one) should line up with the mark on the machine.

Why? If the needle is low, we won’t have enough room underneath to pull it out and insert a new one.
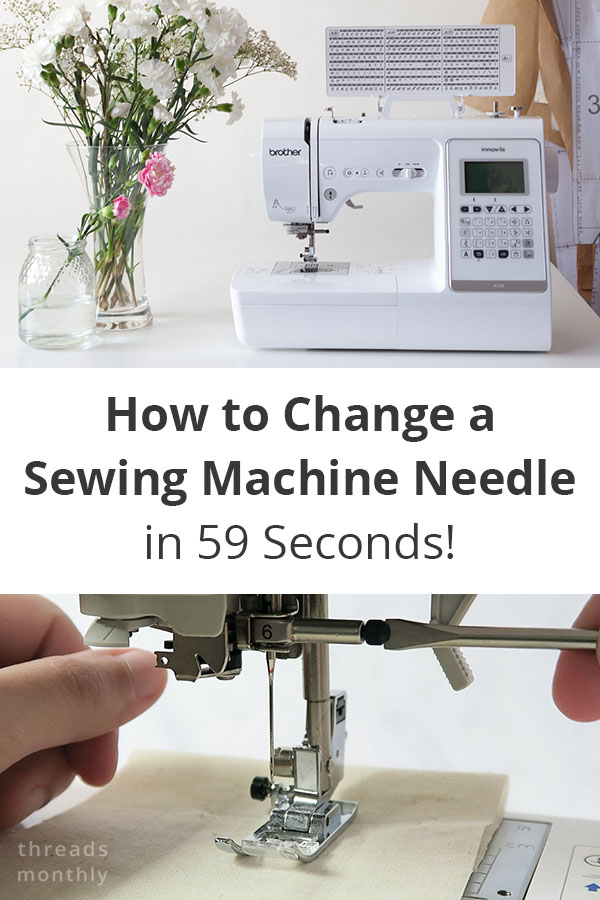
5. Loosen the needle screw by turning it counterclockwise (toward you)
Hold onto the needle with your left hand.
With your right hand, turn the needle screw toward you. (Optional) Use the mini screwdriver that came with your machine to do this.
Here’s what the screw looks like on my old manual machine (brand: E&R Classic).

6. Pull the old needle out
7. Check the new needle
If you’re inserting a needle that’s been used before, check that it’s in good condition.
Place the flat side of the needle on a flat surface (eg. table). Look at it from the side.
If the distance between the needle and flat surface is even, the needle is good to use.
If it’s not even, the needle is bent and should be thrown away. Brother says that a bent needle may cause skipped stitches.

8. Insert the new needle with the flat side facing the back of the machine. Push it up all the way.
The top of your needle will have a curved side and a flat side.

Insert the needle into the needle clamp (the bit that holds the needle) with the flat side facing the back of the machine.
Push the needle all the way up until it hits the needle stopper.
9. Tighten the needle screw by turning it clockwise (away from you)
Hold the needle in place with your left hand.
With your right hand, tighten the needle screw by turning it clockwise (away from you).
Use your screwdriver to make sure the screw is tight, but don’t overtighten it. You might struggle to loosen the screw next time and damage your machine.
All done! You’ve just put in a new needle successfully.
What to read next:
- How To Set Up, Thread & Use Any Sewing Machine in 8 Steps
- How to Thread Any Bobbin (Singer, Brother, Janome) – 6 Ways
- Exact Sewing Machine Settings for Cotton: Tension, Length…
Sources
Singer sewing machine manuals from https://www.singer.com/manuals. Specifically the models: Simple 2263, Quantum Stylist 9960, Brilliance 6180, and Start 1304.
Brother sewing machine manuals from https://support.brother.com/g/b/countrytop.aspx?c=gb&lang=en. Specifically the models: Innov-is A150, L14, and CS-8060.
Janome sewing machine manuals from https://www.janome.com/support/manuals/. Specifically the models: Magnolia 7318, 2222, and DC1018.